It has been a while since I wrote my last blog post. Currently, I am enjoying a small Christmas break and I have spent a bit of my time playing around with a few of my old (pre-blog historical) projects.
Since the year 2016 is almost over, and because it has been roughly 20 years ago since the video game
Duke Nukem 3D was released (1996), there was an abandoned project that particularly caught my interest.
Although the game was a very famous (or perhaps notorious) first-person shooter game known for having highly interactive environments, bad humour and non-linear levels, what I found particularly interesting is that it was also highly
customizable -- it came with a level-editor (
BUILD) allowing anyone to create their own custom maps, an art editor (
EDITART) allowing people to create their own textures and sprites, and a scripting language (
*.CON files) making it possible to modify or extend many aspects of the game, such as the behaviour of enemies, weapons, objects and the levels per episode.
Because of its hackability and the relative simplicity of the game engine and mechanics, these customization features were quite frequently used. Aside from many
user created maps circling around the internet, there were also many
total conversions available completely altering the game's behaviour. Some total conversions I found really interesting were
Ages in Time (turning the game into a medieval setting),
Platoon (a Vietnam war setting) and
Wolf2Duke (a cross-over between
Wolfenstein 3D and Duke Nukem 3D).
In 2003, the
source code of Duke Nukem 3D was released under the GPLv2 (earlier in 2000, the source code of the
BUILD engine that empowers Duke3D as well as several other games had already been released under Ken Silverman's BUILD license).
With the availability of the source code of both the game and the underlying engine, people have been making adjustments to make the game work on other operating systems than DOS (such as Windows and Linux) and enhancing its functionality to make it work better on modern systems.
For example, the most advanced source port of Duke Nukem 3D:
EDuke32 complements the game engine with an OpenGL renderer with dynamic shading support. As a result, one of EDuke32's distinguished features is that it supports the fan-made
High Resolution Pack enhancing the graphics quality of the textures and monsters.
While still being a teenager at high school, I have also spent quite a considerable amount of my spare time playing with these customization features. First, I started creating a couple of custom maps. Later, I started making other kinds of customizations, such as adjusting the monsters' behaviour to make them more dangerous.
I have combined all these modifications into my own total conversion consisting of two modified episodes containing 22 user maps in total. In this blog post, I will describe some of my development experiences.
Creating custom maps
Most of my work on the total conversion was spent on creating my own custom maps. Maps could be constructed with the
BUILD editor included with the game. For example, the following command-line instruction allows us to open the first map of the single player episode of my total conversion:
> BUILD DDSL1.MAP
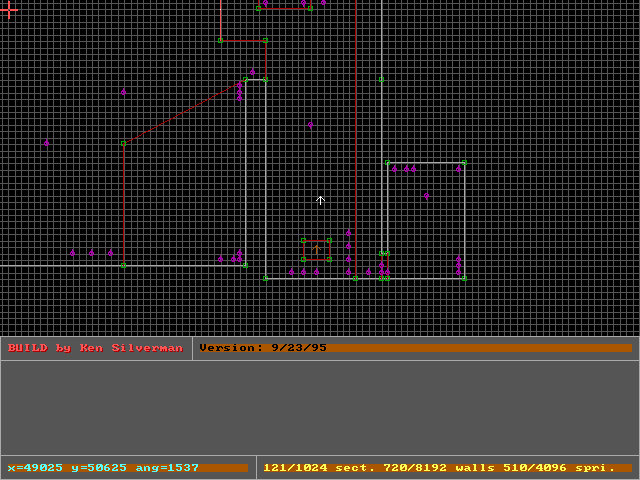
Starting the editor brings you a 2D view of the map shown from above:
Essentially, BUILD engine maps consist of 2D areas called
sectors, denoted by areas surrounded by a white border, as shown in the picture above. It is also possible to create sub sectors (denoted by areas surrounded by a red border), to give sub areas in an existing sector different properties. I, for example, used them a lot for creating shadows.
Besides sectors, objects (such as monsters, items or weapons) are represented as
sprites denoted by purple (or cyan) colored ovals with "sticks" attached to them.
By pressing the enter key on the numeric keypad, you could switch to 3D mode to see what the map would actually look like:
In 3D mode, there were many additional properties you could configure, such as the heights of the floor and ceilings, and the appearance of objects. For example, by pointing the crosshair to a wall, ceiling, floor, or sprite and pressing the 'V' key you could alter a texture or sprite's appearance:
Something that particularly puzzled me in the early beginning was constructing doors, such as garage doors that move up or down. I still remember very well that I had been studying the documentation for days, without any luck.
Eventually, by inspecting/disassembling other user maps I learned how the mechanics really worked -- the trick was to create a dedicated sector for the door and annotating the sector with a lotag and hitag value (that could be configured by pressing the 'T' key):
Lotag and hitag values (as denoted by the grey label in the picture above) were just metadata properties to the editor, but the game engine interpreted lotag values as functionality and hitag values as a means to group objects. The sector lotag value of: 20 corresponds to a function that moves the ceiling up to match the height of neighbouring ceiling once the player touches it. Any other object with the same hitag value would be triggered as well (that is why many doors in a map typically have unique hitag values, unless they were controlled by a key).
Besides configuring a sector to be a door, we also typically want to hear a sound effect when a player opens or closes it. Sound effects could be configured by placing a special-purpose sprite (
MUSICANDSFX) (visible in the editor but invisible in the game), and annotating the sprite with a lotag (through Alt + 'T') corresponding to the number of the audio sample that should be played.
Additionally, we had to lower the door sector's ceiling in 3D mode in such a way that the it touches the ground, as a door is typically supposed to be closed by default. For example, if we "disassemble" a door by moving the ceiling up a bit in 3D mode, this is what we will see:
(As may be observed in the image above, the 'M'-sprite is the special-purpose sprite that configures the sound effect).
In addition to garage doors, there were many other kinds of interactivity patterns thay you could implement, such as rotating doors, elevators, moving vehicles (through moving sectors), shading effects, and objects that spawn if some action is triggered, all by annotating sectors and special-purpose sprites with lotags and hitags.
Despite the richness of features, the BUILD engine version used in Duke Nukem 3D also had a number of big
limitations. For example, while 3D mode gave the player the illusion that he was observing a 3D world, most of its aspects were not truly 3D. For example, it was impossible to look up or down, because of the limitations of the renderer. Nonetheless, the game still gave the player the illusion that this was possible by simply stretching textures and adjusting the positions of the sprites a bit. (As a sidenote: after the source code of the BUILD engine was released, this issue was solved in the Polymost OpenGL-renderer).
Moreover, in 2D mode it was also possible to stack sectors on top of each other. However, in 3D mode you could only observe one of them at the time, preventing players to have a true room over room experience.
In some maps, a room over room experience was faked by "teleporting" a player from one sector to another. For example, when moving from an under water area to the surface, the player was technically "teleported" from one sector to another.
The above picture shows an area in my first map, in which I created a swimming pool. The swimming pool's surface is the rectangled sub sector on the right surrounded by a red border, while the under-water area is the rectangled sector on the left. By placing a sector effector sprite (the S-sprite shown below) in both sectors with a lotag value of: 7 and equal high tags, the teleportation could be controlled:
A similar fake experience was used for lifts -- when moving a lift up or down, the player was also technically teleported from one sector to another.
Another interesting feature of the game is that it was also possible to study and modify the maps that were
included with the game. For example, the following command-line instruction opens the 9th level of the 3th episode:
> BUILD E3L9.MAP
(As a sidenote: if you may wonder why this works, the corresponding file:
E3L9.MAP does not exists as a file, but is extracted from the game data's group file:
DUKE3D.GRP).
Although I created nearly all my maps from scratch, the
E3L9.MAP map, a football stadium in which you had to defeat the cycloid emperor boss, was a bit of a disappointment to me, because it was IMO too small and felt quite incomplete. As result, I created an extended version of the map adding many additional features, such as a stand and locker rooms:
Hacking the CON scripts
After creating a couple of maps and playing some total conversions, I also became interested in studying the CON scripts to see what kinds of modifications I could make. By skimming over them and playing around a bit, I made some interesting discoveries.
One of the things I learned in the
BUILD editor is that you can create palette swapped sprites and textures. In the game, palette swaps were typically used to create color illuminated rooms or to change a monster's behaviour. A prominent example of such a monster is a blue colored lizard trooper that could be changed into a red colored lizard trooper. The latter was slightly stronger and had the ability to teleport.
Besides lizard troopers, it was also possible to create palette swaps of other enemies, such as pig cops, but I noticed that their behaviour did not change at all:
I wanted red colored pig cops to be more menacing than the blue ones. With a few small modifications to the
GAME.CON file, I changed the behaviour of the red colored pig cops to shoot rockets (while keeping the blue colored pig cop's original behaviour intact), by changing the lines:
ifcanshoottarget
{
    sound PIG_ATTACK
    shoot SHOTGUN
    shoot SHOTGUN
    shoot SHOTGUN
    shoot SHOTGUN
    shoot SHOTGUN
}
into:
ifcanshoottarget
{
    ifspritepal 21
    {
        sound RPG_SHOOT
        shoot RPG
        shoot RPG
        shoot RPG
        shoot RPG
        shoot RPG
    }
    else
    {
        sound PIG_ATTACK
        shoot SHOTGUN
        shoot SHOTGUN
        shoot SHOTGUN
        shoot SHOTGUN
        shoot SHOTGUN
    }
}
To make a red colored pig cop drop an RPG instead of a shotgun when it gets killed, I changed:
ifrnd 16
    spawn SHIELD
else
    state drop_shotgun
into:
ifrnd 16
    spawn SHIELD
else
    ifspritepal 21
        state drop_rpg
    else
        state drop_shotgun
Similarly, I modified the code of the lizard mans in such a way that they would shoot with an expander if they were made red, or with a freezer when they are made blue.
In the game, there was also a miniature/weaker version of the first episode's
end boss that behaved in a similar way. Also, when a miniature boss gets defeated, the game did not end.
While studying the CON files, I discovered that miniature versions of the second and third bosses also seemed to exist, but they were not used anywhere in the game. The only limitation that prevented them from being used is that their strength levels were set to
1 so that they would die almost instantly.
I modified their energy levels to make them much stronger, by taking the following lines:
ifspritepal 0
    ai AIBOSS2RUNENEMY
else
{
    strength 1
    sound BOS2_ATTACK ai AIBOSS2SHOOTENEMY
}
and changing the strength value into a something much higher than 1, e.g. 2000. One of the places where I used a miniature boss 2 is in my space station map:
Although these hacked mini bosses seemed to work, I observed that while fighting them, they would quite often hit themselves with their own rockets making it incredibly easy to beat them. :-)
Hacking on Wolf2Duke
Apart from my own, one of the total conversions I found quite interesting was Wolf2Duke creating a cross over between Duke Nukem 3D and Wolfenstein 3D.
Although I liked the idea, I was a bit disappointed about its game experience, because it did not really feel like being in a Wolfenstein 3D game at all. For example, most levels did not use any Wolfenstein 3D textures. Moreover, the enemies also behaved in odd ways and their attacks were extremely powerful.
After studying the total conversion's artifacts, such as the
EDITART files, I noticed that there were many textures and sprites included from the original Wolfenstein 3D, but not used anywhere in the conversion. It even included images for items such as med kits, dogfood, and ammo clips, but no functionality was implemented to make them work.
I modified Wolf2Duke's CON scripts to add some of this missing functionality. I added the following code snippet to make the dog food item grant extra health (20 HP) to the player:
useractor notenemy DOGFOOD
  fall
  ifmove RESPAWN_ACTOR_FLAG
    state respawnit
  else
    ifp pshrunk nullop
    else
      ifp palive
        ifpdistl RETRIEVEDISTANCE
          ifcount 6
            ifphealthl MAXPLAYERHEALTH
              ifcanseetarget
      {
        addphealth 20
        quote 125
        ifspawnedby DOGFOOD
          state wolfgetcode
        else
          state wolfquikget
      }
enda
Moreover, I added some code to make the ammo clip work. When collecting a Wolfenstein 3D ammo clip, it would randomly grant the player pistol or chaingun ammo. How nice is that?
Besides hacking on the CON scripts, I also created two levels using my modified Wolf2Duke features in which I have been trying to create an experience that felt like the original game. Both levels were included as secret levels in my total conversion.
Reflection
I started the work on my own total conversion somewhere in 1997. It took me almost four years to complete it -- I finished my last map somewhere at the end of 2000.
Around 2005 (a few years after the open source release of Duke Nukem 3D and the release of EDuke32 with the High Resolution Pack (HRP)), I made some adjustments to the maps to make them look better when the engine's newer features were used.
Overall, I consider it to be a very interesting learning experience -- I learned a lot about the game engine, the game mechanics, and about game development in general. As a matter of fact, I liked tweaking and constructing my own maps much more than actually playing the game. :-)
With only limited resources, such as a slow dial-up internet connection and limited proficiency in English, I managed to figure out everything on my own. In total, I have created two episodes with 11 levels each. The maps were quite diverse -- for example, I have created city areas, space stations, landscapes, theme parks, factory buildings, and offices.
In my most ambitious map (as shown in the screenshot above), I was attempting to model the entire neighbourhood where I used to grow up. It took me nearly 7 months to complete the map and it became so big that it was pushing the engine to its limits. At some point, I had to make tradeoffs, such as sacrificing shadows, to prevent the game engine from hitting the maximum amount of sectors limit of 8192.
What I also learned is that game development is quite challenging and time consuming -- even without doing any real programming work and having a game engine at my disposal, it still takes a lot of time to construct something coherent, such as the levels, to test them and to tweak/optimize them to make them "feel right". To me, it is no surprise that many modern block buster games take many years to construct.
In addition to Duke Nukem 3D, I also created one user map for
Shadow Warrior. Although it was using an improved version of the same game engine (
BUILD), its game mechanics were completely different.
Furthermore, I made some attempts to construct maps for Unreal and Half-Life 1, but nothing successful came out of it. Due to lack of time and the huge amount of complexity I had to bridge, I lost my interest and changed my software development interests.