Showing posts with label PHP. Show all posts

Tuesday, July 4, 2023

Using a site map for generating dynamic menus in web applications

In the last few weeks, I have been playing around with a couple of old and obsolete web applications that I have developed in the past with my own web framework. Much of the functionality that these custom web applications offer are facilitated by my framework, but sometimes these web applications also contain significant chunks of custom code.

One of the more interesting features provided by custom code is folding menus (also known as dropdown and dropright menus etc.), that provide a similar experience to the Windows start menu. My guess is that because the start menu experience is so familiar to many users, it remains a frequently used feature by many web applications as of today.

When I still used to actively develop my web framework and many custom web applications (over ten years ago), implementing such a feature heavily relied on JavaScript code. For example, I used the onmouseover attribute on a hyperlink to invoke a JavaScript function that unfolds a panel and the onmouseout attribute to fold a panel again. The onmouseover event handler injects a menu section into the DOM using CSS absolute positioning to put it in the right position on the screen.

I could not use the standard menu rendering functionality of my layout framework, because it deliberately does not rely on the usage of JavaScript. As a consequence, I had to write a custom menu renderer for a web application that requires dynamic menu functionality.

Despite the fact that folding menus are popular and I have implemented them as custom code, I never made it a feature of my layout framework for the following two reasons:

  • I want web applications built around my framework to be as declarative as possible -- this means that I want to concisely express as much as possible what I want to render (a paragraph, an image, a button etc. -- this is something HTML mostly does), rather than specifying in detail how to do it (in JavaScript code). As a result, the usage of JavaScript code in my framework is minimized and non-essential.

    All functionality of the web applications that I developed with my framework must be accessible without JavaScript as much possible.
  • Another property that I appreciate of web technology is the ability to degrade gracefully: the most basic and primary purpose of web applications is to provide information as text.

    Because this property is so important, many non-textual elements, such as an image (img element), provide fallbacks (such as an alt attribute) that simply renders alternative text when graphics capabilities are absent. As a result, it is possible to use more primitive browsers (such as text-oriented browsers) or alternative applications to consume information, such as a text-to-speech system.

    When essential functionality is only exposed as JavaScript code (which more primitive browsers cannot interpret), this property is lost.

Recently, I have discovered that there is a way to implement folding menus that does not rely on the usage of JavaScript.

Moreover, there is also another kind of dynamic menu that has become universally accepted -- the mobile navigation menu (or hamburger menu) making navigation convenient on smaller screens, such as mobile devices.

Because these two types of dynamic menus have become so common, I want to facilitate the implementation of such dynamic menus in my layout framework.

I have found an interesting way to make such use cases possible while retaining the ability to render text and degrade gracefully -- we can use an HTML representation of a site map consisting of a root hyperlink and a nested unordered list as a basis ingredient.

In this blog post, I will explain how implementing these use cases are possible.

The site map feature


As already explained, the basis for implementing these dynamic menus is a textual representation of a site map. Generating site maps is a feature that is already supported by the layout framework:


The above screenshot shows an example page that renders a site map of the entire example web application. In HTML, the site map portion has the following structure:

<a href="/examples/simple/index.php">Home</a>

<ul>
    <li>
        <a href="/examples/simple/index.php/home">Home</a>
    </li>
    <li>
        <a href="/examples/simple/index.php/page1">Page 1</a>
        <ul>
            <li>
                <a href="/examples/simple/index.php/page1/page11">Subpage 1.1</a>
            </li>
            <li>
                <a href="/examples/simple/index.php/page1/page12">Subpage 1.2</a>
            </li>
        </ul>
    </li>
    <li>
        <a href="/examples/simple/index.php/page2">Page 2</a>
        ...
    </li>
    ...
</ul>

The site map, shown in the screenshot and code fragment above, consists of three kinds of links:

  • On top, the root link is displayed that brings the user to the entry page of the web application.
  • The unordered list displays links to all the pages visible in the main menu section that are reachable from the entry page.
  • The nested unordered list displays links to all the pages visible in the sub menu section that are reachable from the selected sub page in the main menu.

With a few simple modifications to my layout framework, I can use a site map as an alternative type of menu section:

  • I have extended the site map generator with the ability to mark selected sub pages and as active, similar to links in menu sections. By adding the active CSS class as an attribute to a hyperlink, a link gets marked as active.
  • I have introduced a SiteMapSection to the layout framework that can be used as a replacement for a MenuSection. A MenuSection displays reachable pages as hyperlinks from a selected page on one level in the page hierarchy, whereas a SiteMap section renders the selected page as a root link and all its visible sub pages and transitive sub pages.

With the following model of a layout:

$application = new Application(
    /* Title */
    "Site map menu website",

    /* CSS stylesheets */
    array("default.css"),

    /* Sections */
    array(
        "header" => new StaticSection("header.php"),
        "menu" => new SiteMapSection(0),
        "contents" => new ContentsSection(true)
    ),

    ...
);

We may render an application with pages that have the following look:


As can be seen in the above screenshot and code fragment, the application layout defines three kinds of sections: a header (a static section displaying a logo), a menu (displaying links to sub pages) and a contents section that displays the content based on the sub page that was selected by the user (in the menu or by opening a URL).

The menu section is displayed as a site map. This site map will be used as the basis for the implementation of the dynamic menus that I have described earlier in this blog post.

Implementing a folding menu


Turning a site map into a folding menu, by using only HTML and CSS, is a relatively straight forward process. To explain the concepts, I can use the following trivial HTML page as a template:


The above page only contains a root link and nested unordered list representing a site map.

In CSS, we can hide the root link and the nested unordered lists by default with the following rules:

/* This rule hides the root link */
body > a
{
    display: none;
}

/* This rule hides nested unordered lists */
ul li ul
{
    display: none;
}

resulting in the following page:


With the following rule, we can make a nested unordered list visible when a user hovers over the surrounding list item:

ul li:hover ul
{
    display: block;
}

Resulting in a web page that behaves as follows:


As can be seen, the unordered list that is placed under the Page 2 link became visible because the user hovers over the surrounding list item.

I can make the menu a bit more fancy if I want to. For example, I can remove the bullet points with the following CSS rule:

ul
{
    list-style-type: none;
    margin: 0;
    padding: 0;
}

I can add borders around the list items to make them appear as buttons:

ul li
{
    border-style: solid;
    border-width: 1px;
    padding: 0.5em;
}

I can horizontally align the buttons by adopting a flexbox layout using the row direction property:

ul
{
    display: flex;
    flex-direction: row;
}

I can position the sub menus right under the buttons of the main menu by using a combination of relative and absolute positioning:

ul li
{
    position: relative;
}

ul li ul
{
    position: absolute;
    top: 2.5em;
    left: 0;
}

Resulting in a menu with the following behaviour:


As can be seen, the trivial example application provides a usable folding menu thanks to the CSS rules that I have described.

In my example application bundled with the layout framework, I have applied all the rules shown above and combined them with the already existing CSS rules, resulting in a web application that behaves as follows:


Displaying a mobile navigation menu


As explained in the introduction, another type of dynamic menu that has been universally accepted is the mobile navigation menu (also known as a hamburger menu). Implementing such a menu, despite its popularity, is challenging IMHO.

Although there seem to be ways to implement such a menu without JavaScript (such as this example using a checkbox) the only proper way to do it IMO is still to use JavaScript. Some browsers have trouble accepting such HTML+CSS-only implementations and it requires the use of an HTML element (an input element) that is not designed for that purpose.

In my example web application, I have implemented a custom JavaScript module, that dynamically transforms a site map (that may have already been displayed as a folding menu) into a mobile navigation menu by performing the following steps:

  • We query the root link of the site map and transform it into a mobile navigation menu button by replacing the text of the root link by an icon image. Clicking on the menu button makes the navigation menu visible or invisible.
  • The first level sub menu becomes visible by adding the CSS class: navmenu_active to the unordered list.
  • The menu button becomes active by adding the CSS class: navmenu_icon_active to the image of the root link.
  • Nested menus can be unfolded or folded. The JavaScript code adds fold icons to each list item of the unordered lists that embed a nested unordered list.
  • Clicking on the fold icon makes the nested unordered list visible or invisible.
  • A nested unordered list becomes visible by adding the CSS class: navsubmenu_active to the unordered list
  • A fold button becomes active by adding the CSS class: navmenu_unfold_active to the fold icon image

It was quite a challenge to implement this JavaScript module, but it does the trick. Moreover, the basis remains a simple HTML-rendered site map that can still be used in text-oriented browsers.

The result of using this JavaScript module is the following navigation menu that has unfoldable sub menus:


Concluding remarks


In this blog post, I have explained a new feature addition to my layout framework: the SiteMapSection that can be used to render menu sections as site maps. Site maps can be used as a basis to implement dynamic menus, such as folding menus and mobile navigation menus.

The benefit of using a site map as a basis ingredient is that a web page still remains useful in its most primitive form: text. As a result, I retain two important requirements of my web framework: declarativity (because a nested unordered list describes concisely what I want) and the ability to degrade gracefully (because it stays useful when it is rendered as text).

Developing folding/navigation menus in the way I described is not something new. There are plenty of examples on the web that show how such features can be developed, such as these W3Schools dropdown menu and mobile navigation menu examples.

Compared to many existing solutions, my approach is somewhat puristic -- I do not abuse HTML elements (such as a check box), I do not rely on using helper elements (such as divs and spans) or helper CSS classes/ids. The only exception is to support dynamic features that are not part of HTML, such as "active links" and the folding/unfolding buttons of the mobile navigation menu.

Although it has become possible to use my framework to implement mobile navigation menus, I still find it sad that I have to rely on JavaScript code to do it properly.

Folding menus, despite their popularity, are nice but the basic one-level menus (that only display a collection of links/buttons of sub pages) are in my opinion fine too and much simpler -- the same implementation is usable on desktops, mobile devices and text-oriented browsers.

With folding menus, I have to test multiple resolutions and devices to check whether they provide the right user experience. Folding menus are useless on mobile devices --- you cannot separately trigger a hover event without generating a click event, making it impossible to unfold a sub menu and peek what is inside.

When it is also desired to provide an optimal mobile device experience, you also need to implement an alternative menu. This requirement makes the implementation of a web application significantly more complex.

Availability


The SiteMapSection has become a new feature of the Java, PHP and JavaScript implementations of my layout framework and can be obtained from my GitHub page.

In addition, I have added a sitemapmenu example web application that displays a site map section in multiple ways:

  • In text mode, it is just displayed as a (textual) site map
  • In graphics mode, when the screen width is 1024 pixels or greater, it displays a horizontal folding menu.
  • In graphics mode, when the screen width is smaller than 1024 pixels and JavaScript is disabled, it displays a vertical folding menu.
  • In graphics mode, when the screen width is smaller than 1024 pixels and JavaScript is enabled, it displays a mobile navigation menu.

Friday, December 30, 2022

A summary of my layout framework improvements

It has been quiet for a while on my blog. In the last couple of months, I have been improving my personal web application framework, after several years of inactivity.

The reason why I became motivated to work on it again, is because I wanted to improve the website of the musical society that I am a member of. This website is still one of the few consumers of my personal web framework.

One of the areas for improvement is the user experience on mobile devices, such as phones and tablets.

To make these improvements possible, I wanted to get rid of complex legacy functionality, such as the "One True Layout" method, that heavily relies on all kinds of interesting hacks that are no longer required in modern browsers. Instead, I wanted to use a flexbox layout that is much more suitable for implementing the layout aspects that I need.

As I have already explained in previous blog posts, my web application framework is not monolithic -- it consists of multiple components each addressing a specific concern. These components can be used and deployed independently.

The most well-explored component is the layout framework that addresses the layout concern. It generates pages from a high-level application model that defines common layout aspects of an application and the pages of which an application consists including their unique content parts.

I have created multiple implementations of this framework in three different programming languages: Java, PHP, and JavaScript.

In this blog post, I will give a summary of all the recent improvements that I made to the layout framework.

Background


As I have already explained in previous blog posts, the layout framework is very straight forward to use. As a developer, you need to specify a high-level application model and invoke a view function to render a sub page belonging to the application. The layout framework uses the path components in a URL to determine which sub page has been selected.

The following code fragment shows an application model for a trivial test web application:

use SBLayout\Model\Application;
use SBLayout\Model\Page\StaticContentPage;
use SBLayout\Model\Page\Content\Contents;
use SBLayout\Model\Section\ContentsSection;
use SBLayout\Model\Section\MenuSection;
use SBLayout\Model\Section\StaticSection;

$application = new Application(
    /* Title */
    "Simple test website",

    /* CSS stylesheets */
    array("default.css"),

    /* Sections */
    array(
        "header" => new StaticSection("header.php"),
        "menu" => new MenuSection(0),
        "contents" => new ContentsSection(true),
    ),

    /* Pages */
    new StaticContentPage("Home", new Contents("home.php"), array(
        "page1" => new StaticContentPage("Page 1", new Contents("page1.php")),
        "page2" => new StaticContentPage("Page 2", new Contents("page2.php")),
        "page3" => new StaticContentPage("Page 3", new Contents("page3.php"))
    ))
);

The above application model captures the following application layout properties:

  • The title of the web application is: "Simple test website" and displayed as part of the title of any sub page.
  • Every page references the same external CSS stylesheet file: default.css that is responsible for styling all pages.
  • Every page in the web application consists of the same kinds of sections:
    • The header element refers to a static header section whose purpose is to display a logo. This section is the same for every sub page.
    • The menu element refers to a MenuSection whose purpose is to display menu links to sub pages that can be reached from the entry page.
    • The contents element refers to a ContentsSection whose purpose is to display contents (text, images, tables, itemized lists etc.). The content is different for each selected page.
  • The application consists of a number of pages:
    • The entry page is a page called: 'Home' and can be reached by opening the root URL of the web application: http://localhost
    • The entry page refers to three sub pages: page1, page2 and page3 that can be reached from the entry page.

      The array keys refer to the path component in the URL that can be used as a selector to open the sub page. For example, http://localhost/page1 will open the page1 sub page and http://localhost/page2 will open the page2 sub page.

The currently selected page can be rendered with the following function invocation:

\SBLayout\View\HTML\displayRequestedPage($application);

By default, the above function generates a simple HTML page in which each section gets translated to an HTML div element:


The above screenshot shows what a page in the application could look like. The grey panel on top is the header that displays the logo, the blue bar is menu section (that displays links to sub pages that are reachable from the entry page), and the black area is the content section that displays the selected content.

One link in the menu section is marked as active to show the user which page in the page hierarchy (page1) has been selected.

Compound sections


Although the framework's functionality works quite well for most of my old use cases, I learned that in order to support flexbox layouts, I need to nest divs, which is something the default HTML code generator: displayRequestedPage() cannot do (as a sidenote: it is possible to create nestings by developing a custom generator).

For example, I may want to introduce another level of pages and add a submenu section to the layout, that is displayed on the left side of the screen.

To make it possible to position the menu bar on the left, I need to horizontally position the submenu and contents sections, while the remaining sections: header and menu must be vertically positioned. To make this possible with flexbox layouts, I need to nest the submenu and contents in a container div.

Since flexbox layouts have become so common nowadays, I have introduced a CompoundSection object, that acts as a generic container element.

With a CompoundSection, I can nest divs:

/* Sections */
array(
    "header" => new StaticSection("header.php"),
    "menu" => new MenuSection(0),
    "container" => new CompoundSection(array(
        "submenu" => new MenuSection(1),
        "contents" => new ContentsSection(true)
    ))
),

In the above code fragment, the container section will be rendered as a container div element containing two sub div elements: submenu and contents. I can use the nested divs structure to vertically and horizontally position the sections in the way that I described earlier.


The above screenshot shows the result of introducing a secondary page hierarchy and a submenu section (that has a red background).

By introducing a container element (through a CompoundSection) it has become possible to horizontally position the submenu next to the contents section.

Easier error handling


Another recurring issue is that most of my applications have to validate user input. When user input is incorrect, a page needs to be shown that displays an error message.

Previously, error handling and error page redirection was entirely the responsibility of the programmer -- it had to be implemented in every controller, which is quite a repetitive process.

In one of my test applications of the layout framework, I have created a page with a form that asks for the user's first and last name:


I wanted to change the example application to return an error message when any of these mandatory attributes were not provided.

To ease that burden, I have made framework's error handling mechanism more generic. Previously, the layout manager only took care of two kinds of errors: when an invalid sub page is requested, a PageNotFoundException is thrown redirecting the user to the 404 error page. When the accessibility criteria have not been met (e.g. a user is not authenticated) a PageForbiddenException is thrown directing the user to the 403 error page.

In the revised version of the layout framework, the PageNotFoundException and PageForbiddenException classes have become sub classes of the generic PageException class. This generic error class makes it possible for the error handler to redirect users to error pages for any HTTP status code.

Error pages should be added as sub pages to the entry page. The numeric keys should match the corresponding HTTP status codes:

/* Pages */
new StaticContentPage("Home", new Contents("home.php"), array(
    "400" => new HiddenStaticContentPage("Bad request", new Contents("error/400.php")),
    "403" => new HiddenStaticContentPage("Forbidden", new Contents("error/403.php")),
    "404" => new HiddenStaticContentPage("Page not found", new Contents("error/404.php"))
    ...
))
I have also introduced a BadRequestException class (that is also a sub class of PageException) that can be used for handling input validation errors.

PageExceptions can be thrown from controllers with a custom error message as a parameter. I can use the following controller implementation to check whether the first and last names were provided:

use SBLayout\Model\BadRequestException;

if($_SERVER["REQUEST_METHOD"] == "POST") // This is a POST request
{
    if(array_key_exists("firstname", $_POST) && $_POST["firstname"] != ""
        && array_key_exists("lastname", $_POST) && $_POST["lastname"] != "")
        $GLOBALS["fullname"] = $_POST["firstname"]." ".$_POST["lastname"];
    else
        throw new BadRequestException("This page requires a firstname and lastname parameter!");
}

The side effect is that if the user forgets to specify any of these mandatory attributes, he gets automatically redirected to the bad request error page:


This improved error handling mechanism significantly reduces the amount of boilerplate code that I need to write in applications that use my layout framework.

Using the iterator protocol for sub pages


As can be seen in the application model examples, some pages in the example applications have sub pages, such as the entry page.

In the layout framework, there are three kinds of pages that may provide sub pages:

  • A StaticContentPage object is a page that may refer to a fixed/static number of sub pages (as an array object).
  • A PageAlias object, that redirects the user to another sub page in the application, also offers the ability to refer users to a fixed/static number of sub pages (as an array object).
  • There is also a DynamicContentPage object in which a sub page can interpret the path component as a dynamic value. That dynamic value can, for example, be used as a parameter for a query that retrieves a record from a database.

In the old implementation of my framework, the code that renders the menu sections always has to treat these objects in a special way to render links to their available sub pages. As a result, I had to use the instanceof operator a lot, which is in a bad code smell.

I have changed the framework to use a different mechanism for stepping over sub pages: iterators or iterables (depending on the implementation language).

The generic Page class (that is the parent class of all page objects) provides a method called: subPageIterator() that returns an iterator/iterable that yields no elements. The StaticContentPage and PageAlias classes override this method to return an interator/iterable that steps over the elements in the array of sub pages.

Using iterators/iterables has a number of nice consequences -- I have eliminated two special cases and a bad code smell (the intensive use of instanceof), significantly improving the quality and readability of my code.

Another nice property is that it is also possible to override this method with a custom iterator, that for example, fetches sub page configurations from a database.

The pagemanager framework (another component in my web framework) offers a content management system giving end-users the ability to change the page structure and page contents. The configuration of the pages is stored in a database.

Although the pagemanager framework uses the layout framework for the construction of pages, it used to rely on custom code to render the menu sections.

By using the iterator protocol, it has become possible to re-use the menu section functionality from the layout framework eliminating the need for custom code. Moreover, it has also become much easier to integrate the pagemanager framework into an application because no additional configuration work is required.

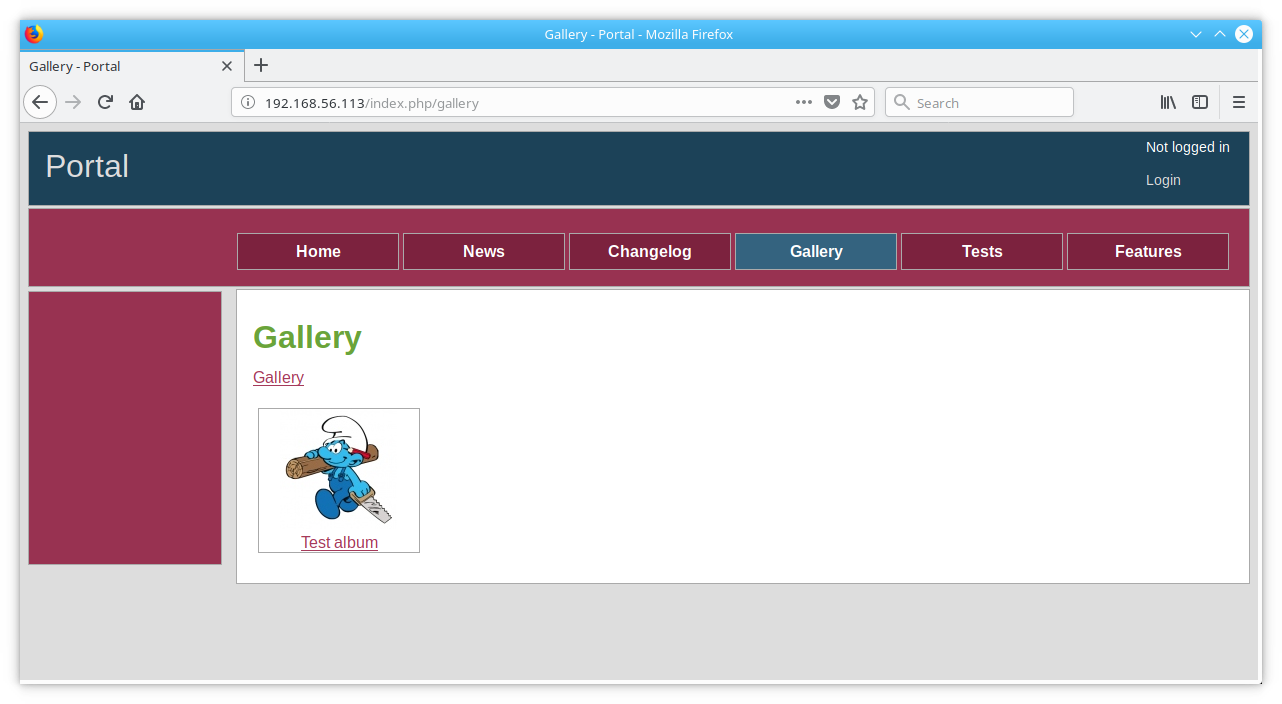
I have also created a gallery application that makes it possible to expose the albums as items in the menu sections. Rendering the menu sections also used to rely on custom code, but thanks to using the iterator protocol that custom code was completely eliminated.

Flexible presentation of menu items


As I have already explained, an application layout can be divided into three kinds of sections. A StaticSection remains the same for any requested sub page, and a ContentSection is filled with content that is unique for the selected page.

In most of my use-cases, it is only required to have a single dynamic content section.

However, the framework is flexible enough to support multiple content sections as well. For example, the following screenshot shows the advanced example application (included with the web framework) in which both the header and the content sections change for each sub page:


The presentation of the third kind of section: MenuSection still used to remain pretty static -- they are rendered as div elements containing hyperlinks. The page that is currently selected is marked as active by using the active class property.

For most of my use-cases, just rendering hyperlinks suffices -- with CSS you can still present them in all kinds of interesting ways, e.g. by changing their colors, adding borders, and changing some its aspects when the user hovers with the mouse cursor over it.

In some rare cases, it may also be desired to present links to sub pages in a completely different way. For example, you may want to display an icon or add extra styling properties to an individual button.

To allow custom presentations of hyperlinks, I have added a new parameter: menuItem to the constructors of page objects. The menuItem parameter refers to a code snippet that decides how to render the link in a menu section:

new StaticContentPage("Icon", new Contents("icon.php"), "icon.php")

In the above example, the last parameter to the constructor, refers to an external file: menuitem/icon.php:

<span>
	<?php
	if($active)
	{
		?>
		<a class="active" href="<?= $url ?>">
			<img src="<?= $GLOBALS["baseURL"] ?>/image/menu/go-home.png" alt="Home icon">
			<strong><?= $subPage->title ?></strong>
		</a>
		<?php
	}
	else
	{
		?>
		<a href="<?= $url ?>">
			<img src="<?= $GLOBALS["baseURL"] ?>/image/menu/go-home.png" alt="Home icon">
			<?= $subPage->title ?>
		</a>
		<?php
	}
	?>
</span>

The above code fragment specifies how a link in the menu section should be displayed when the page is active or not active. We use the custom rendering code to display a home icon before showing the hyperlink.

In the advanced test application, I have added an example page in which every sub menu item is rendered in a custom way:


In the above screenshot, we should see two custom presented menu items in the submenu section on the left. The first has the home icon added and the second uses a custom style that deviates from the normal page style.

If no menuItem parameter was provided, the framework just renders a menu item as a normal hyperlink.

Other functionality


In addition to the new functionality explained earlier, I also made a number of nice small feature additions:


  • A function that displays bread crumbs (the route from the entry page to the currently opened page). The route is derived automatically from the requested URL and application model.
  • A function that displays a site map that shows the hierarchy of pages.
  • A function that makes it possible to embed a menu section in arbitrary sections of a page.

Conclusion


I am quite happy with the recent feature changes that I made to the layout framework. Although I have not done any web front-end development for quite some time, I had quite a bit of fun doing it.

In addition to the fact that useful new features were added, I have also simplified the codebase and improved its quality.

Availability


The Java, PHP and JavaScript implementations of my layout framework can be obtained from my GitHub page. Use them at your own risk!

Sunday, February 25, 2018

A more realistic public Disnix example

It has almost been ten years ago when I started developing Disnix -- February 2008 marked the start of my master's thesis internship at Philips Research that resulted in the first prototype version.

Originally, Disnix was specifically developed for one use case only -- a medical service-oriented system called the "Service Development Support System" (SDS2) that can be used for asset tracking and utilisation analysis for medical devices in a hospital environment. More information about this case study can be found in my master's thesis, some of my research papers and my PhD thesis (all of them can be found on my publications page).

Many developments have happened since the realization of the first prototype -- its feature set has been extended considerably, its architecture has been overhauled several times and the code has evolved significantly. Most notably, I have been maintaining a production system for over three years with it.

In all these years, there is always one recurring question that I regularly receive from various kinds of people:

Why should I use Disnix and why would it be useful?

The answer is that Disnix becomes useful when you have a system that can be decomposed into distributable services, such as web services, RESTful services, web applications or processes.

In addition to the fact that Disnix automates its deployment and offers a number of powerful quality properties (e.g. non-destructive upgrades for the static parts of a system), it also helps componentized systems in reaching their full potential -- for example, when services can be built, deployed, and managed individually you can scale a system up and down (e.g. by distributing services to dedicated machines or consolidating all services on a single machine) and you can anticipate more flexibly to events (e.g. by redeploying services when we encounter a crashing machine).

Although the answer may sound simple, service-oriented systems are complicated -- besides facing all kinds of deployment complexities, properly dividing a system into distributable components is also quite challenging. For all the systems I have seen in the last decade, the requirements and their modularization strategies were all quite different from each other. I have also seen a number of systems for which decomposing into services did not work and unnecessary complexities were introduced.

Moreover, it is hard to find representative public examples that people can use as a reference. I was fortunate that I had access to an industrial case study during my research. Nonetheless, I was suffering from many difficulties because of the lack of any meaningful public case studies. As a countermeasure, I developed a collection of example cases in addition to SDS2, but because of their over-simplicity, proving my point often remained hard.

Roughly half a year ago, I have released most parts of my ancient web framework that I used to actively develop before I started doing research in software deployment and I created a couple of example applications for it.


Although my web framework development predates my deployment research, I was already using it to implement information systems that followed some modularity principles that are beneficial when using Disnix as a deployment system.

Recently, I have extended my web framework's example applications repository (providing a homework assistant, CMS, photo gallery and literature survey assistant) to become another public Disnix example case following the same modularity principles I used for the information systems I used to implement at that time.

Creating a componentized web information system


As mentioned earlier in this blog post, I have already implemented a (fairly simple) componentized web information system before I started working on Disnix using my ancient custom made web framework. The "componentization process" (a term that I had neither learned about yet nor something I was consciously implementing at that time) was partially driven by evolution and partially by non-functional requirements.

Originally, the system started out as just one single web application for one specific purpose and consisted of only two components -- a MySQL database responsible for storing the data and web front-end implemented in PHP, which is quite a common separation pattern for PHP applications.

Later, I was asked to implement another PHP application with similar functionality. Initially, I wrote the application from scratch without any reuse in mind, but at some point I made two important decisions:

  • I decided to keep the databases of each applications separate as opposed to integrating all the tables into one single database. My main motivating factor was that I wanted to prevent another developer's wrong decisions from messing up the other application. Moreover, I realized that for the data that was specific to the application domain that other systems did not have to know about it.
  • In addition to domain specific data, I noticed that both databases also stored the same kind of data, namely: user accounts -- both systems had a user account system to allow users to change the data. This also did not motivate me to integrate both databases into one database. Instead, I created a separate user database and authentication system (as a library API) that was shared among both applications.

After completing the two web applications, I had to implement more functionality. I decided to keep all of these new features for these new problem domains in separate applications with separate databases. The only thing they had in common was a shared user authentication system.

At some point I ended up having many sub applications. As a result, I needed a portal application that redirected users to these sub applications. Essentially, what I implemented became a system of systems.

Deployment with Disnix


The "architectural decisions" that I described earlier resulted in a system composed of several kinds of components:

  • Domain-specific web applications exposing functionality that logically belongs together.
  • Domain-specific databases storing tables that are strongly correlated.
  • A shared user database.
  • A portal application redirecting users to the domain-specific web applications.

The above listed components can be distributed over multiple machines in a network, because they connect to each other through network links (e.g. connecting to a MySQL database can be done with a TCP connection and connecting to a domain specific web application can be done through HTTP). As a result, they can also be modeled as services that can be deployed with Disnix.

To replicate the same patterns for demo purposes, I integrated my framework's example applications into a similar system of sub systems. We can deploy the corresponding example system to one single target machine with Disnix, by running:

$ disnixos-env -s services.nix \
  -n network-single.nix \
  -d distribution-single.nix --use-nixops

The entire system gets deployed to a single machine because of the distribution model (distribution.nix) that maps all services to one target machine:

{infrastructure}:

{
  usersdb = [ infrastructure.test1 ];
  cmsdb = [ infrastructure.test1 ];
  cmsgallerydb = [ infrastructure.test1 ];
  homeworkdb = [ infrastructure.test1 ];
  literaturedb = [ infrastructure.test1 ];
  portaldb = [ infrastructure.test1 ];

  cms = [ infrastructure.test1 ];
  cmsgallery = [ infrastructure.test1 ];
  homework = [ infrastructure.test1 ];
  literature = [ infrastructure.test1 ];
  users = [ infrastructure.test1 ];
  portal = [ infrastructure.test1 ];
}

The resulting deployment architecture looks as follows:


The above visualization of the deployment architecture shows the following aspects:

  • The surrounding light grey colored box denotes a target machine. In this particular example, we only have one single target machine where services are deployed to.
  • The dark grey colored boxes correspond to container environments. For our example system, we have two of them: mysql-database corresponding to a MySQL DBMS server and apache-webapplication corresponding to an Apache HTTP server.
  • The ovals denote services corresponding to MySQL databases and web applications.
  • The arrows denote inter-dependency links that correspond to network connections. As explained in my previous blog post, solid arrows are dependencies with a strict ordering requirement while dashed arrows are dependencies without an ordering requirement.

Some people may argue that it is not really beneficial to deploy such a system with Disnix -- with NixOps you can define a machine configuration having a MySQL DBMS server and an Apache HTTP server with the corresponding databases and web application components. With Disnix, you must first ensure that the machines, the MySQL and Apache HTTP servers are configured by other means first (that could for example be done with NixOps), and then you have to deploy the system's components with Disnix.

In a single machine deployment scenario, it may indeed not be that beneficial. However, what you get in addition to automated deployment is also more flexibility. Since Disnix manages the services directly, as opposed to entire machine configurations as a whole, you can anticipate better in case of events by redeploying the system.

For example, when the amount of visitors keeps growing, you may run into the problem that a single server can no longer handle all the traffic. In such cases, you can easily add another machine to the network and adjust the distribution model to move (for example) the databases to another machine:

{infrastructure}:

{
  usersdb = [ infrastructure.test2 ];
  cmsdb = [ infrastructure.test2 ];
  cmsgallerydb = [ infrastructure.test2 ];
  homeworkdb = [ infrastructure.test2 ];
  literaturedb = [ infrastructure.test2 ];
  portaldb = [ infrastructure.test2 ];

  cms = [ infrastructure.test1 ];
  cmsgallery = [ infrastructure.test1 ];
  homework = [ infrastructure.test1 ];
  literature = [ infrastructure.test1 ];
  users = [ infrastructure.test1 ];
  portal = [ infrastructure.test1 ];
}

By redeploying the system, we can take advantage of the additional system resources that the new machine provides:

$ disnixos-env -s services.nix \
  -n network-separate.nix \
  -d distribution-separate.nix --use-nixops

resulting in the following deployment architecture:


Likewise, there are countless of other deployment strategies possible to meet all kinds of non-functional requirements. For example, we can also distribute bundles of domain specific application and database pairs over two machines:

$ disnixos-env -s services.nix \
  -n network-bundles.nix \
  -d distribution-bundles.nix --use-nixops

resulting in the following deployment architecture:


This approach is even more scalable than simply offloading the databases to another server.

In addition to scalability, there are countless of other reasons to pick a certain distribution strategy. You could also, for example, distribute redundant instances of databases and applications as a failover to improve availability or improve security by deploying the databases with privacy sensitive data to a machine with restrictive network access.

State management


When updating the deployment of systems with Disnix (such as moving a database from one machine to another), there may be a recurring limitation that you could run frequently into -- like Nix, Disnix only manages the static parts of the system, but not any state. This means that a service's deployment can be reproduced elsewhere, but data, such as the content of a database is not migrated.

For example, the sub system of example applications stores two kinds of data -- records in the MySQL database and files, such as images uploaded in the photo gallery or PDF files uploaded to the literature application. When moving these applications around the data is not migrated.

As a possible solution, Disnix also provides simple state management facilities. When enabled, Disnix will take snapshots of the databases and filesets on the source machines, transfers the snapshots to the target machines, and finally restores the snapshots when moving a service one machine to another in the distribution model.

State management can be enabled globally by passing the --deploy-state parameter to (disnix-env or annotating the services with deployState = true; in the services model):

$ disnixos-env -s services.nix \
  -n network-bundles.nix \
  -d distribution-bundles.nix --use-nixops --deploy-state

We can also directly use the state management system, e.g. for backup purposes. When running the following command:

$ disnix-snapshot

Disnix takes snapshots of all databases and web application state (e.g. the images in the photo gallery and uploaded PDF files) and transfers them to the coordinator machine. With the dysnomia-snapshots tool we can inspect the snapshot store:

$ dysnomia-snapshots --query-all
apache-webapplication/cms/1f9ed847885d2b3e3c67c51231122d958751eb5e2443c281e02e1d7108a505a3
apache-webapplication/cmsgallery/28d17a6941cb195a92e748aae737ccf524747477c6943436b734891d0f36fd53
apache-webapplication/literature/ed5ec4f8b9b4fcdb8b740ad1fa7ecb40b10dece03548f1d6e09a6a82c804131b
apache-webapplication/portal/5bbea499f8f8a4f708bb873ad683dbf088afa4c553f90ab287a9249a7ef02651
mysql-database/cmsdb/aa75992f780991c39a0969dcac5f69b04685c4fa764937476b816e938d6972ba
mysql-database/cmsgallerydb/31ebdaba658ca376123ff6a91a3e275731b383346a07840b1acaa1e44d921b65
mysql-database/homeworkdb/f0fda91545af0cb300afd84592d4914dcd48257053401e232438e34d83af828d
mysql-database/literaturedb/cb881c2200a5f1562f0b66f1394d0902bbb8e2361068fe096faac3bc31f76b5d
mysql-database/portaldb/5d8a5cb952f40ce76f93eb939d0b37eab33736d7b1e1426038322f8a572034ee
mysql-database/usersdb/64d11fc7f8969da5da318276a666f2e00e0a020ba619a1d82ed9b84a7f1c2ca6

and with some shell scripting, the actual contents of the snapshot store:

$ find $(dysnomia-snapshots --resolve $(dysnomia-snapshots --query-all)) -type f
/home/sander/state/snapshots/apache-webapplication/cms/1f9ed847885d2b3e3c67c51231122d958751eb5e2443c281e02e1d7108a505a3/state.tar.xz
/home/sander/state/snapshots/apache-webapplication/cmsgallery/28d17a6941cb195a92e748aae737ccf524747477c6943436b734891d0f36fd53/state.tar.xz
/home/sander/state/snapshots/apache-webapplication/literature/ed5ec4f8b9b4fcdb8b740ad1fa7ecb40b10dece03548f1d6e09a6a82c804131b/state.tar.xz
/home/sander/state/snapshots/apache-webapplication/portal/5bbea499f8f8a4f708bb873ad683dbf088afa4c553f90ab287a9249a7ef02651/state.tar.xz
/home/sander/state/snapshots/mysql-database/cmsdb/aa75992f780991c39a0969dcac5f69b04685c4fa764937476b816e938d6972ba/dump.sql.xz
/home/sander/state/snapshots/mysql-database/cmsgallerydb/31ebdaba658ca376123ff6a91a3e275731b383346a07840b1acaa1e44d921b65/dump.sql.xz
/home/sander/state/snapshots/mysql-database/homeworkdb/f0fda91545af0cb300afd84592d4914dcd48257053401e232438e34d83af828d/dump.sql.xz
/home/sander/state/snapshots/mysql-database/literaturedb/cb881c2200a5f1562f0b66f1394d0902bbb8e2361068fe096faac3bc31f76b5d/dump.sql.xz
/home/sander/state/snapshots/mysql-database/portaldb/5d8a5cb952f40ce76f93eb939d0b37eab33736d7b1e1426038322f8a572034ee/dump.sql.xz
/home/sander/state/snapshots/mysql-database/usersdb/64d11fc7f8969da5da318276a666f2e00e0a020ba619a1d82ed9b84a7f1c2ca6/dump.sql.xz

The above output shows that for each MySQL database, we store a compressed SQL dump of the database and for each stateful web application, a compressed tarball of state files.

Conclusion


In this blog post, I have described a more realistic public Disnix example that is inspired by my web framework developments a long time ago. Aside from automating a system's deployment, the purpose of this blog post is to describe how a system that can be decomposed into distributable services that can be deployed with Disnix. Implementing such a system is all but trivial and driven by various kinds of design decisions.

Availability


The example web application system can be obtained from my GitHub page. The Disnix deployment expressions can be found in the deployment/ sub folder.

In addition, I have created a Dysnomia module named: fileset that can capture the state files of web applications in a compressed tarball.

After the recent developments the Disnix toolset has reached a new stable point. As a result, I have decided to release Disnix 0.8. Consult the Disnix homepage for more information!

Friday, November 3, 2017

Creating custom object transformations with NiJS and PNDP

In a number earlier blog posts, I have described two kinds of internal DSLs for Nix -- NiJS is a JavaScript-based internal DSL and PNDP is a PHP-based internal DSL.

These internal DSLs have a variety of application areas. Most of them are simply just experiments, but the most serious application area is code generation.

Using an internal DSL for generation has a number of advantages over string generation that is more commonly used. For example, when composing strings containing Nix expressions, we must make sure that any variable in the host language that we append to a generated expression is properly escaped to prevent code injection attacks.

Furthermore, we also have to take care of the indentation if we want to output Nix expression code that should be readable. Finally, string manipulation itself is not a very intuitive activity as it makes it very hard to read what the generated code would look like.

Translating host language objects to the Nix expression language


A very important feature of both internal DSLs is that they can literally translate some language constructs from the host language (JavaScript or PHP) to the Nix expression because they have (nearly) an identical meaning. For example, the following JavaScript code fragment:

var nijs = require('nijs');

var expr = {
  hello: "Hello",
  name: {
    firstName: "Sander",
    lastName: "van der Burg"
  },
  numbers: [ 1, 2, 3, 4, 5 ]
};

var output = nijs.jsToNix(expr, true);
console.log(output);

will output the following Nix expression:

{
  hello = "Hello",
  name = {
    firstName = "Sander";
    lastName = "van der Burg";
  };
  numbers = [
    1
    2
    3
    4
    5
  ];
}

In the above example, strings will be translated to strings (and quotes will be escaped if necessary), objects to attribute sets, and the array of numbers to a list of numbers. Furthermore, the generated code is also pretty printed so that attribute set and list members have 2 spaces of indentation.

Similarly, in PHP we can compose the following code fragment to get an identical Nix output:

use PNDP\NixGenerator;

$expr = array(
  "hello" => "Hello",
  "name" => array(
    "firstName" => "Sander",
    "lastName => "van der Burg"
  ),
  "numbers" => array(1, 2, 3, 4, 5)
);

$output = NixGenerator::phpToNix($expr, true);
echo($output);

The PHP generator uses a number of clever tricks to determine whether an array is associative or sequential -- the former gets translated into a Nix attribute set while the latter gets translated into a list.

There are objects in the Nix expression language for which no equivalent exists in the host language. For example, Nix also allows you to define objects of a 'URL' and 'file' type. Neither JavaScript nor PHP have a direct equivalent. Moreover, it may be desired to generate other kinds of language constructs, such as function declarations and function invocations.

To still generate these kinds of objects, you must compose an abstract syntax tree from objects that inherit from the NixObject prototype or class. For example, we can define a function invocation to fetchurl {} in Nixpkgs as follows in JavaScript:

var expr = new nijs.NixFunInvocation({
    funExpr: new nijs.NixExpression("fetchurl"),
    paramExpr: {
        url: new nijs.NixURL("mirror://gnu/hello/hello-2.10.tar.gz"),
        sha256: "0ssi1wpaf7plaswqqjwigppsg5fyh99vdlb9kzl7c9lng89ndq1i"
    }
});

and in PHP as follows:

use PNDP\AST\NixExpression;
use PNDP\AST\NixFunInvocation;
use PNDP\AST\NixURL;

$expr = new NixFunInvocation(new NixExpression("fetchurl"), array(
    "url" => new NixURL("mirror://gnu/hello/hello-2.10.tar.gz"),
    "sha256" => "0ssi1wpaf7plaswqqjwigppsg5fyh99vdlb9kzl7c9lng89ndq1i"
));

Both of the objects in the above code fragments translate to the following Nix expression:

fetchurl {
  url = mirror://gnu/hello/hello-2.10.tar.gz;
  sha256 = "0ssi1wpaf7plaswqqjwigppsg5fyh99vdlb9kzl7c9lng89ndq1i";
}

Transforming custom object structures into Nix expressions


The earlier described use cases are basically one-on-one translations from the host language (JavaScript or PHP) to the guest language (Nix). In some cases, literal translations do not make sense -- for example, it may be possible that we already have an application with an existing data model from which we want to derive deployments that should be carried out with Nix.

In the latest versions of NiJS and PNDP, it is also possible to specify how to transform custom object structures into a Nix expression. This can be done by inheriting from the NixASTNode class or prototype and overriding the toNixAST() method.

For example, we may have a system already providing a representation of a file that should be downloaded from an external source:

function HelloSourceModel() {
    this.src = "mirror://gnu/hello/hello-2.10.tar.gz";
    this.sha256 = "0ssi1wpaf7plaswqqjwigppsg5fyh99vdlb9kzl7c9lng89ndq1i";
}

The above module defines a constructor function composing an object that refers to the GNU Hello package provided by a GNU mirror site.

A direct translation of an object constructed by the above function to the Nix expression language does not provide anything meaningful -- it can, for example, not be used to let Nix fetch the package from the mirror site.

We can inherit from NixASTNode and implement our own custom toNixAST() function to provide a more meaningful Nix translation:

var nijs = require('nijs');
var inherit = require('nijs/lib/ast/util/inherit.js').inherit;

/* HelloSourceModel inherits from NixASTNode */
inherit(nijs.NixASTNode, HelloSourceModel);

/**
 * @see NixASTNode#toNixAST
 */
HelloSourceModel.prototype.toNixAST = function() {
    return this.args.fetchurl()({
        url: new nijs.NixURL(this.src),
        sha256: this.sha256
    });
};

The toNixAST() function shown above composes an abstract syntax tree (AST) for a function invocation to fetchurl {} in the Nix expression language with the url and sha256 properties a parameters.

An object that inherits from the NixASTNode prototype also indirectly inherits from NixObject. This means that we can directly attach such an object to any other AST object. The generator uses the underlying toNixAST() function to automatically convert it to its AST representation:

var helloSource = new HelloSourceModel();
var output = nijs.jsToNix(helloSource, true);
console.log(output);

In the above code fragment, we directly pass the construct HelloSourceModel object instance to the generator. The output will be the following Nix expression:

fetchurl {
  url = mirror://gnu/hello/hello-2.10.tar.gz;
  sha256 = "0ssi1wpaf7plaswqqjwigppsg5fyh99vdlb9kzl7c9lng89ndq1i";
}

In some cases, it may not be possible to inherit from NixASTNode, for example, when the object already inherits from another prototype or class that is beyond the user's control.

It is also possible to use the NixASTNode constructor function as an adapter. For example, we can take any object with a toNixAST() function:

var helloSourceWrapper = {
    toNixAST: function() {
        return new nijs.NixFunInvocation({
            funExpr: new nijs.NixExpression("fetchurl"),
            paramExpr: {
                url: new nijs.NixURL(this.src),
                sha256: this.sha256
            }
        });
    }
};

By wrapping the helloSourceWrapper object in the NixASTNode constructor, we can convert it to an object that is an instance of NixASTNode:

new nijs.NixASTNode(helloSourceWrapper)

In PHP, we can change any class into a NixASTNode by implementing the NixASTConvertable interface:

use PNDP\AST\NixASTConvertable;
use PNDP\AST\NixURL;

class HelloSourceModel implements NixASTConvertable
{
    /**
     * @see NixASTConvertable::toNixAST()
     */
    public function toNixAST()
    {
        return $this->args->fetchurl(array(
            "url" => new NixURL($this->src),
            "sha256" => $this->sha256
        ));
    }
}

By passing an object that implements the NixASTConvertable interface to the NixASTNode constructor, it can be converted:

new NixASTNode(new HelloSourceModel())

Motivating use case: the node2nix and composer2nix generators


My main motivation to use custom transformations is to improve the quality of the node2nix and composer2nix generators -- the former converts NPM package configurations to Nix expressions and the latter converts PHP composer package configurations to Nix expressions.

Although NiJS and PNDP provide a number of powerful properties to improve the code generation steps of these tools, e.g. I no longer have to think much about escaping strings or pretty printing, there are still many organizational coding issues left. For example, the code that parses the configurations, fetches the external sources, and generates the code are mixed. As a consequence, the code is very hard to read, update, maintain and to ensure its correctness.

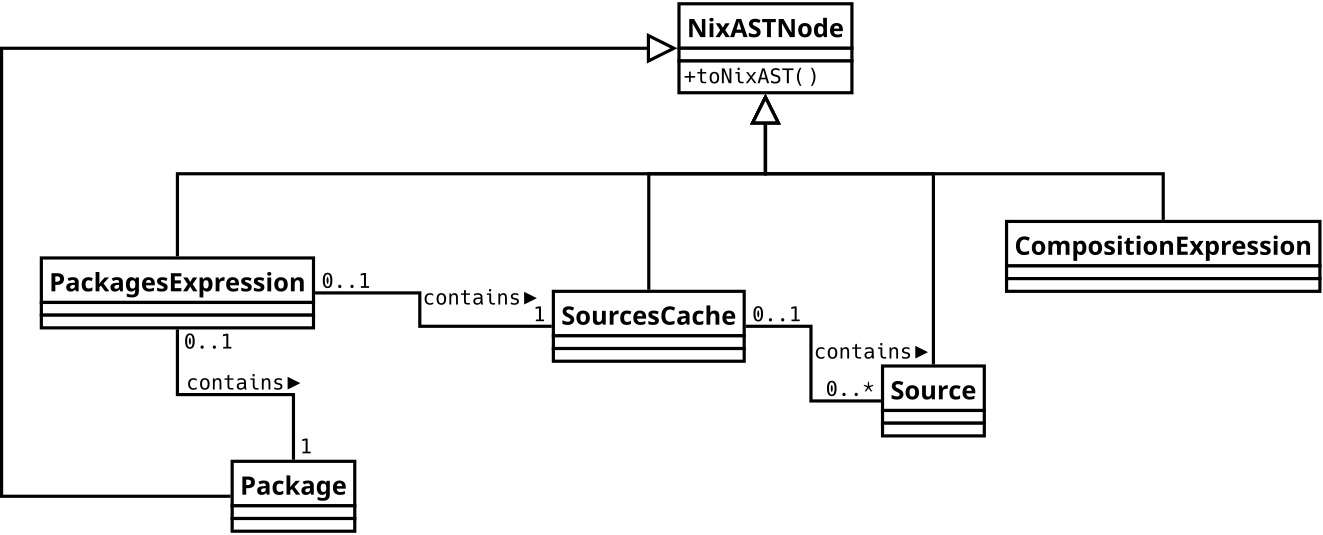
The new transformation facilities allow me to separate concerns much better. For example, both generators now have a data model that reflects the NPM and composer problem domain. For example, I could compose the following (simplified) class diagram for node2nix's problem domain:


A crucial part of node2nix's generator is the package class shown on the top left on the diagram. A package requires zero or more packages as dependencies and may provide zero or more packages in the node_modules/ folder residing in the package's base directory.

For readers not familiar with NPM's dependency management: every package can install its dependencies privately in a node_modules/ folder residing in the same base directory. The CommonJS module ensures that every file is considered to be a unique module that should not interfere with other modules. Sharing is accomplished by putting a dependency in a node_modules/ folder of an enclosing parent package.

NPM 2.x always installs a package dependency privately unless a parent package exists that can provide a conforming version. NPM 3.x (and later) will also move a package into the node_modules/ folder hierarchy as high as possible to prevent too many layers of nested node_modules/ folders (this is particularly a problem on Windows). The class structure in the above diagram reflects this kind of dependency organisation.

In addition to a package dependency graph, we also need to obtain package metadata and compute their output hashes. NPM packages originate from various kinds of sources, such as the NPM registry, Git repositories, HTTP sites and local directories on the filesystem.

To optimize the process and support sharing of common sources among packages, we can use a source cache that memorizes all unique source referencess.

The Package::resolveDependencies() method sets the generation process in motion -- it will construct the dependency graph replicating NPM's dependency resolution algorithm as faithfully as possible, and resolves all the dependencies' (and transitive dependencies) metadata.

After resolving all dependencies and their metadata, we must generate the output Nix expressions. One Nix expression is copied (the build infrastructure) and two are generated -- a composition expression and a package or collection expression.

We can also compose a class diagram for the generation infrastructure:


In the above class diagram, every generated expression is represented a class inheriting from NixASTNode. We can also reuse some classes from the domain model as constituents for the generated expressions, by also inheriting from NixASTNode and overriding the toNixAST() method:

  • The source objects can be translated into sub expressions that invoke fetchurl {} and fetchgit {}.
  • The sources cache can be translated into an attribute set exposing all sources that are used as dependencies for packages.
  • A package instance can be converted into a function invocation to nodeenv.buildNodePackage {} that, in addition to configuring build properties, binds the required dependencies to the sources in the sources cache attribute set.

By decomposing the expression into objects and combining the objects' AST representations, we can nicely modularize the generation process.

For composer2nix, we can also compose a class diagram for its domain -- the generation process:


The above class diagram has many similarities, but also some major differences compared to node2nix. composer provides so-called lock files that pinpoint the exact versions of all dependencies and transitive dependencies. As a result, we do not need to replicate composer's dependency resolution algorithm.

Instead, the generation process is driven by the ComposerConfig class that encapsulates the properties of the composer.json and composer.lock files of a package. From a composer configuration, the generator constructs a package object that refers to the package we intend to deploy and populates a source cache with source objects that come from various sources, such as Git, Mercurial and Subversion repositories, Zip files, and directories residing on the local filesystem.

For the generation process, we can adopt a similar strategy that exposes the generated Nix expressions as classes and uses some classes of the domain model as constituents for the generation process:


Discussion


In this blog post, I have described a new feature for the NiJS and PNDP frameworks, making it possible to implement custom transformations. Some of its benefits are that it allows an existing object model to be reused and concerns in an application can be separated much more conveniently.

These facilities are not only useful for the improvement of the architecture of the node2nix and composer2nix generators -- at the company I work for (Conference Compass), we developed our own domain-specific configuration management tool.

Despite the fact that it uses several tools from the Nix project to carry out deployments, it uses a domain model that is not Nix-specific at all. Instead, it uses terminology and an organization that reflects company processes and systems.

For example, we use a backend-for-frontend organization that provides a backend for each mobile application that we ship. We call these backends configurators. Optionally, every configurator can import data from various external sources that we call channels. The tool's data model reflects this kind of organization, and generates Nix expressions that contain all relevant implementation details, if necessary.

Finally, the fact that I modified node2nix to have a much cleaner architecture has another reason beyond quality improvement. Currently, NPM version 5.x (that comes with Node.js 8.x) is still unsupported. To make it work with Nix, we require a slightly different generation process and a completely different builder environment. The new architecture allows me to reuse the common parts much more conveniently. More details about the new NPM support will follow (hopefully) soon.

Availability


I have released new versions of NiJS and PNDP that have the custom transformation facilities included.

Furthermore, I have decided to release new versions for node2nix and composer2nix that use the new generation facilities in their architecture. The improved architecture revealed a very uncommon but nasty bug with bundled dependencies in node2nix, that is now solved.

Tuesday, October 3, 2017

Deploying PHP composer packages with the Nix package manager

In two earlier blog posts, I have described various pieces of my custom web framework that I used to actively develop many years ago. The framework is quite modular -- every concern, such as layout management, data management, the editor, and the gallery, are separated into packages that can be deployed independently, so that web applications only have to include what they actually need.

Although modularity is quite useful for a variety of reasons, the framework did not start out as being modular in the beginning -- when I just started developing web applications in PHP, I did not reuse anything at all. Slowly, I discovered similarities between my projects and started sharing snippets of common functionality between them. Gradually, I learned that keeping these common aspects up to date became a burden. As a result, I developed a "common framework" that I reused among all my PHP projects.

Having a common framework for my web application projects reduced the amount of required maintenance, but introduced a new drawback -- its size kept growing and growing. As a result, many simple web applications that only required a small subset of the framework's functionality still had to embed the entire framework, making them unnecessarily big.

Today, a bit of extra PHP code is not so much of a problem, but around the time I was still actively developing web applications, many shared web hosting providers only offered a small amount of storage capacity, typically just a few megabytes.

To cope with the growing size of the framework, I decided to modularize the code by separating the framework's concerns into packages that can be deployed independently. I "invented" my own conventions to integrate the framework packages into web applications:

  • In the base directory of the web application project, I create a lib/ directory that contains symlinks to the framework packages.
  • In every PHP script that displays a page (typically only index.php), I configure the include path to refer to the packages' content in the lib/ folder, such as:

    set_include_path("./lib/sblayout:./lib/sbdata:./lib/sbcrud");
    

  • Each PHP module is responsible for loading the desired classes or utility functions from the framework packages. As a result, I ended up writing a substantial amount of require() statements, such as:

    require_once("data/model/Form.class.php");
    require_once("data/model/field/HiddenField.class.php");
    require_once("data/model/field/TextField.class.php");
    require_once("data/model/field/DateField.class.php");
    require_once("data/model/field/TextAreaField.class.php");
    require_once("data/model/field/URLField.class.php");
    require_once("data/model/field/FileField.class.php");
    

After my (approximately) 8 years of absence from the PHP domain, I discovered that a tool has been developed to support convenient construction of modular PHP applications: composer. Composer is heavily inspired by the NPM package manager, that is the defacto package delivery mechanism for Node.js applications.

In the last couple of months (it progresses quite slowly as it is a non-urgent side project), I have decided to get rid of my custom modularity conventions in my framework packages, and to adopt composer instead.

Furthermore, composer is a useful deployment tool, but its scope is limited to PHP applications only. As frequent readers may probably already know, I use Nix-based solutions to deploy entire software systems (that are also composed of non-PHP packages) from a single declarative specification.

To be able to include PHP composer packages in a Nix deployment process, I have developed a generator named: composer2nix that can be used to generate Nix deployment expressions from composer configuration files.

In this blog post, I will explain the concepts of composer2nix and show how it can be used.

Using composer


Using composer is generally quite straight forward. In the most common usage scenario, there is typically a PHP project (often a web application) that requires a number of dependencies. By changing the current working folder to the project directory, and running:

$ composer install

Composer will obtain all required dependencies and stores them in the vendor/ sub directory.

The vendor/ folder follows a very specific organisation:

$ find vendor/ -maxdepth 2 -type d
vendor/bin
vendor/composer
vendor/phpdocumentor
vendor/phpdocumentor/fileset
vendor/phpdocumentor/graphviz
vendor/phpdocumentor/reflection-docblock
vendor/phpdocumentor/reflection
vendor/phpdocumentor/phpdocumentor
vendor/svanderburg
vendor/svanderburg/pndp
...

The vendor/ folder structure (mostly) consists two levels: the outer directory defines the namespace of the packages and the inner directory the package names.

There are a couple of folders deviating from this convention -- most notably, the vendor/composer directory, that is used by composer to track package installations:

$ ls vendor/composer
autoload_classmap.php
autoload_files.php
autoload_namespaces.php
autoload_psr4.php
autoload_real.php
autoload_static.php
ClassLoader.php
installed.json
LICENSE

In addition to obtaining packages and storing them in the vendor/ folder, composer also generates autoload scripts (as shown above) that can be used to automatically make code units (typically classes) provided by the packages available for use in the project. Adding the following statement to one of your project's PHP scripts:

require_once("vendor/autoload.php");

suffices to load the functionality exposed by the packages that composer installs.

Composer can be used to install both runtime and development dependencies. Many development dependencies (such as phpunit or phpdocumentor) provide command-line utilities to carry out tasks. Composer packages can also declare which executables they provide. Composer automatically generates symlinks for all provided executables in the: vendor/bin folder:

$ ls -l vendor/bin/
lrwxrwxrwx 1 sander users 29 Sep 26 11:49 jsonlint -> ../seld/jsonlint/bin/jsonlint
lrwxrwxrwx 1 sander users 41 Sep 26 11:49 phpdoc -> ../phpdocumentor/phpdocumentor/bin/phpdoc
lrwxrwxrwx 1 sander users 45 Sep 26 11:49 phpdoc.php -> ../phpdocumentor/phpdocumentor/bin/phpdoc.php
lrwxrwxrwx 1 sander users 34 Sep 26 11:49 pndp-build -> ../svanderburg/pndp/bin/pndp-build
lrwxrwxrwx 1 sander users 46 Sep 26 11:49 validate-json -> ../justinrainbow/json-schema/bin/validate-json

For example, you can run the following command-line instruction from the base directory of a project to generate API documentation:

$ vendor/bin/phpdocumentor -d src -t out

In some cases (the composer documentation often discourages this) you may want to install end-user packages globally. They can be installed into the global composer configuration directory by running:

$ composer global require phpunit/phpunit

After installing a package globally (and adding: $HOME/.config/composer/vendor/bin directory to the PATH environment variable), we should be able to run:

$ phpunit --help

The composer configuration


The deployment operations that composer carries out are driven by a configuration file named: composer.json. An example of such a configuration file could be:

{
  "name": "svanderburg/composer2nix",
  "description": "Generate Nix expressions to build PHP composer packages",
  "type": "library",
  "license": "MIT",
  "authors": [
      {
          "name": "Sander van der Burg",
          "email": "svanderburg@gmail.com",
          "homepage": "http://sandervanderburg.nl"
      }
  ],

  "require": {
      "svanderburg/pndp": "0.0.1"
  },
  "require-dev": {
      "phpdocumentor/phpdocumentor": "2.9.x"
  },

  "autoload": {
      "psr-4": { "Composer2Nix\\": "src/Composer2Nix" }
  },

  "bin": [ "bin/composer2nix" ]
}

The above configuration file declares the following configuration properties:

  • A number of meta attributes, such as the package name, description, license and authors.
  • The package type. The type: library indicates that this project is a library that can be used in another project.
  • The project's runtime (require) and development (require-dev) dependencies. In a dependency object, the keys refer to the package names and the values to version specifications that can be either:
    • A semver compatible version specifier that can be an exact version (e.g. 0.0.1), wildcard (e.g. 1.0.x), or version range (e.g. >= 1.0.0).
    • A version alias that directly (or indirectly) resolves to a branch in the VCS repository of the dependency. For example, the dev-master version specifier refers to the current master branch of the Git repository of the package.
  • The autoloader configuration. In the above example, we configure the autoloader to load all classes belonging to the Composer2Nix namespace, from the src/Composer2Nix sub directory.

By default, composer obtains all packages from the Packagist repository. However, it is also possible to consult other kinds of repositories, such as external HTTP sites or VCS repositories of various kinds (including Git, Mercurial and Subversion).

External repositories can be specified by adding a 'repositories' object to the composer configuration:

{
  "name": "svanderburg/composer2nix",
  "description": "Generate Nix expressions to build PHP composer packages",
  "type": "library",
  "license": "MIT",
  "authors": [
      {
          "name": "Sander van der Burg",
          "email": "svanderburg@gmail.com",
          "homepage": "http://sandervanderburg.nl"
      }
  ],
  "repositories": [
      {
          "type": "vcs",
          "url": "https://github.com/svanderburg/pndp"
      }
  ],

  "require": {
      "svanderburg/pndp": "dev-master"
  },
  "require-dev": {
      "phpdocumentor/phpdocumentor": "2.9.x"
  },

  "autoload": {
      "psr-4": { "Composer2Nix\\": "src/Composer2Nix" }
  },

  "bin": [ "bin/composer2nix" ]
}

In the above example, we have defined PNDP's GitHub repository as an external repository and changed the version specifier of svanderburg/pndp to use the latest Git master branch.

Composer uses a version resolution strategy that will parse composer configuration files and branch names in all repositories to figure out where a version can be obtained from and takes the first option that matches the dependency specification. Packagist is consulted last, making it possible for the user to override dependencies.

Pinpointing dependency versions


The version specifiers of dependencies in a composer.json configuration file are nominal and have some drawbacks when it comes to reproducibility -- for example, the version specifier: >= 1.0.1 may resolve to version 1.0.2 today and to 1.0.3 tomorrow, making it very difficult to exactly reproduce a deployment elsewhere at a later point in time.

Although direct dependencies can be easily controlled by the user, it is quite difficult to control the version resolutions of the transitive dependencies. To cope with this problem, composer will always generate lock files (composer.lock) that pinpoint the exact dependency versions (including all transitive dependencies) the first time when it gets invoked (or when composer update is called):

{
    "_readme": [
        "This file locks the dependencies of your project to a known state",
        "Read more about it at https://getcomposer.org/doc/01-basic-usage.md#composer-lock-the-lock-file",
        "This file is @generated automatically"
    ],
    "content-hash": "ca5ed9191c272685068c66b76ed1bae8",
    "packages": [
        {
            "name": "svanderburg/pndp",
            "version": "v0.0.1",
            "source": {
                "type": "git",
                "url": "https://github.com/svanderburg/pndp.git",
                "reference": "99b0904e0f2efb35b8f012892912e0d171e9c2da"
            },
            "dist": {
                "type": "zip",
                "url": "https://api.github.com/repos/svanderburg/pndp/zipball/99b0904e0f2efb35b8f012892912e0d171e9c2da",
                "reference": "99b0904e0f2efb35b8f012892912e0d171e9c2da",
                "shasum": ""
            },
            "bin": [
                "bin/pndp-build"
            ],
            ...
        }
        ...
    ]
}

By bundling the composer.lock file with the package, it becomes possible to reproduce a deployment elsewhere with the exact same package versions.

The Nix package manager


Nix is a package manager whose main purpose is to build all kinds of software packages from source code, such as GNU Autotools, CMake, Perl's MakeMaker, Apache Ant, and Python projects.

Nix's main purpose is not be a build tool (it can actually also be used for building projects, but this application area is still highly experimental). Instead, Nix manages dependencies and complements existing build tools by providing dedicated build environments to make deployments reliable and reproducible, such as clearing all environment variables, making files read-only after the package has been built, restricting network access and resetting the files' timestamps to 1.

Most importantly, in these dedicated environments Nix ensures that only specified dependencies can be found. This may probably sound inconvenient at first, but this property exists for a good reason: if a package unknowingly depends on another package then it may work on the machine where it has been built, but may fail on another machine because this unknown dependency is missing. By building a package in a pure environment in which all dependencies are known, we eliminate this problem.

To provide stricter purity guarantees, Nix isolates packages by storing them in a so-called "Nix store" (that typically resides in: /nix/store) in which every directory entry corresponds to a package. Every path in the Nix store is prefixed by hash code, such as:

/nix/store/2gi1ghzlmb1fjpqqfb4hyh543kzhhgpi-firefox-52.0.1

The hash is derived from all build-time dependencies to build the package.

Because every package is stored in its own path and variants of packages never share the same name because of the hash prefix, it becomes harder for builds to accidentally succeed because of undeclared dependencies. Dependencies can only be found if the environment has been configured in such a way that the Nix store paths to the packages are known, for example, by configuring environment variables, such as: export PATH=/nix/store/5vyssyqvbirdihqrpqhbkq138ax64bjy-gnumake-4.2.1/bin.

The Nix expression language and build environment abstractions have all kinds of facilities to make the configuration of dependencies convenient.

Integrating composer deployments into Nix builder environments


Invoking composer in a Nix builder environment introduces an additional challenge -- composer is not only a tool that does build management (e.g. it can execute script directives that can carry out arbitrary build steps), but also dependency management. The latter property conflicts with the Nix package manager.

In a Nix builder environment, network access is typically restricted, because it affects reproducibility (although it still possible to hack around this restriction) -- when downloading a file from an external site it is not known in advance what you will get. An unknown artifact influences the outcome of a package build in unpredictable ways.

Network access in Nix build environments is only permitted in so-called fixed output derivations. For a fixed output derivation, the output hash must be known in advance so that Nix can verify whether we have obtained the artifact we want.

The solution to cope with a conflicting dependency manager is by substituting it -- we must let Nix obtain the dependencies and force the tool to only execute its build management tasks.

We can populate the vendor/ folder ourselves. As explained earlier, the composer.lock file stores the exact versions of pinpointed dependencies including all transitive dependencies. For example, when a project declares svanderburg/pndp version 0.0.1 as a dependency, it may translate to the following entry in the composer.lock file:

"packages": [
    {
        "name": "svanderburg/pndp",
        "version": "v0.0.1",
        "source": {
            "type": "git",
            "url": "https://github.com/svanderburg/pndp.git",
            "reference": "99b0904e0f2efb35b8f012892912e0d171e9c2da"
        },
        "dist": {
            "type": "zip",
            "url": "https://api.github.com/repos/svanderburg/pndp/zipball/99b0904e0f2efb35b8f012892912e0d171e9c2da",
            "reference": "99b0904e0f2efb35b8f012892912e0d171e9c2da",
            "shasum": ""
        },
        ...
    }
    ...
]

As can be seen in the code fragment above, the dependency translates to two kinds of pinpointed source objects -- a source reference to a specific revision in a Git repository and a dist reference to a zipball containing a snapshot of the given Git revision.

The reason why every dependency translates to two kinds of objects is that composer supports two kinds of installation modes: source (to obtain a dependency directly from a VCS) and dist (to obtain a dependency from a zipball).

We can translate the 'dist' reference into the following Nix function invocation:

"svanderburg/pndp" = {
  targetDir = "";
  src = composerEnv.buildZipPackage {
    name = "svanderburg-pndp-99b0904e0f2efb35b8f012892912e0d171e9c2da";
    src = fetchurl {
      url = https://api.github.com/repos/svanderburg/pndp/zipball/99b0904e0f2efb35b8f012892912e0d171e9c2da;
      sha256 = "19l7i7adp76bjf32x9a2ykm0r5cgcmi4wf4cm4127miy3yhs0n4y";
    };
  };
};

and the 'source' reference to the following Nix function invocation:

"svanderburg/pndp" = {
  targetDir = "";
  src = fetchgit {
    name = "svanderburg-pndp-99b0904e0f2efb35b8f012892912e0d171e9c2da";
    url = "https://github.com/svanderburg/pndp.git";
    rev = "99b0904e0f2efb35b8f012892912e0d171e9c2da";
    sha256 = "15i311dc0123v3ppa69f49ssnlyzizaafzxxr50crdfrm8g6i4kh";
  };
};

(As a sidenote: we need the targetDir property to provide compatibility with the deprecated PSR-0 autoloading standard. Old autoload packages can be stored in a sub folder of a package residing in the vendor/ structure.)

To generate the above function invocations, we need more than just the properties provided by the composer.lock file. Since download functions in Nix are fixed output derivations, we must compute the output hashes of the downloads by invoking a Nix prefetch script, such as nix-prefetch-url or nix-prefetch-git. The composer2nix generator will automatically invoke the appropriate prefetch script to augment the generated expressions with output hashes.

To ensure maximum compatibility with composer's behaviour, the dependencies obtained by Nix must be copied into to the vendor/ folder. In theory, symlinking would be more space efficient, but experiments have shown that some packages (such as phpunit) may attempt to load the project's autoload script, e.g. by invoking:

require_once(realpath("../../autoload.php"));

The above require invocation does not work if the dependency is a symlink -- the require path resolves to a path in the Nix store (e.g. /nix/store/...). The parent's parent path corresponds to /nix where no autoload script is stored. (As a sidenote: I have decided to still provide symlinking as an option for deployment scenarios where this is not an issue).

After some experimentation, I discovered that composer uses the following file to track which packages have been installed: vendor/composer/installed.json. The contents appears to be quite similar to the composer.lock file:

[
    {
        "name": "svanderburg/pndp",
        "version": "v0.0.1",
        "version_normalized": "0.0.1.0",
        "source": {
            "type": "git",
            "url": "https://github.com/svanderburg/pndp.git",
            "reference": "99b0904e0f2efb35b8f012892912e0d171e9c2da"
        },
        "dist": {
            "type": "zip",
            "url": "https://api.github.com/repos/svanderburg/pndp/zipball/99b0904e0f2efb35b8f012892912e0d171e9c2da",
            "reference": "99b0904e0f2efb35b8f012892912e0d171e9c2da",
            "shasum": ""
        },
        ...
    },
    ...
]

Reconstructing the above file can be done by merging the contents of the packages and packages-dev objects in the composer.lock file.

Another missing piece in the puzzle is the autoload scripts. We can force composer to dump the autoload script, by running:

$ composer dump-autoload --optimize

The above command generates an optimized autoloader script. A non-optimized autoload script dynamically inspects the contents of the package folders to load modules. This is convenient in the development stage of a project, in which the files continuously change, but in production environments this introduces quite a bit of load time overhead.

Since packages in the Nix store can never change after they have been built, it makes no sense to generate a non-optimized autoloader script.

Finally, the last remaining practical issue, is PHP packages providing command-line utilities. Most executables have the following shebang line:

#!/usr/bin/env php

To ensure that these CLI tools work in Nix builder environments, the above shebang must be subsituted by the PHP executable that resides in the Nix store.

After carrying out the above described steps, running the following command:

$ composer install --optimize-autoloader

is simply just a formality -- it will not download or change anything.

Use cases


composer2nix has a variety of use cases. The most obvious one is to use it to package a web application project with Nix instead of composer. Running the following command generates Nix expressions from the composer configuration files:

$ composer2nix

By running the following command, we can use Nix to obtain the dependencies and generate a package with a vendor/ folder:

$ nix-build
$ ls result/
index.php  vendor/

In addition to web applications, we can also deploy command-line utility projects implemented in PHP. For these kinds of projects it make more sense generate a bin/ sub folder in which the executables can be found.

For example, for the composer2nix project, we can generate a CLI-specific expression by adding the --executable parameter:

$ composer2nix --executable

We can install the composer2nix executable in our Nix profile by running:

$ nix-env -f default.nix -i

and then invoke composer2nix as follows:

$ composer2nix --help

We can also deploy third party command-line utilities directly from the Packagist repository:

$ composer2nix -p phpunit/phpunit
$ nix-env -f default.nix -iA phpunit-phpunit
$ phpunit --version

The most powerful application is not the integration with Nix itself, but the integration with other Nix projects. For example, we can define a NixOS configuration running an Apache HTTP server instance with PHP and our example web application:

{pkgs, config, ...}:

let
  myexampleapp = import /home/sander/myexampleapp {
    inherit pkgs;
  };
in
{
  services.httpd = {
    enable = true;
    adminAddr = "admin@localhost";
    extraModules = [
      { name = "php7"; path = "${pkgs.php}/modules/libphp7.so"; }
    ];
    documentRoot = myexampleapp;
  };

  ...
}

We can deploy the above NixOS configuration as follows:

$ nixos-rebuild switch

By running only one simple command-line instruction, we have a running system with the Apache webserver serving our web application.

Discussion


In addition to composer2nix, I have also been responsible for developing node2nix, a tool that generates Nix expressions from NPM package configurations. Because composer is heavily inspired by NPM, we see many similarities in the architecture of both generators. For example, both generate the same kinds of expressions (a builder environment, a packages expression and a composition expression), have a similar separation of concerns, and both use an internal DSL for generating Nix expressions (NiJS and PNDP).

There are also a number of conceptual differences -- dependencies in NPM can be private to a package or shared among multiple packages. In composer, all dependencies in a project are shared.

The reason why NPM's dependency management is more powerful is because Node.js uses the CommonJS module system. CommonJS considers each file to be a unique module. This, for example, makes it possible for one module to load a version of a package from a certain filesystem location and another version of the same package from another filesystem location within the same project.

By contrast, in PHP, isolation is accomplished by the namespace declarations in each file. Namespaces can not be dynamically altered so that multiple versions can safely coexist in one project. Furthermore, the vendor/ directory structure makes it possible to store only one variant of a package.

Despite the fact that composer's dependency management is less powerful makes constructing a generator much more straightforward compared to NPM.

Another feature that composer supports for quite some time, and NPM until very recently is pinpointing/locking dependencies. When generating Nix expressions from NPM package configurations, we must replicate NPM's dependency resolving algorithm. In composer, we can simply take whatever the composer.lock file provides. The lock file saves us from replicating the dependency lookup process making the generation process considerably easier.

Acknowledgments


My implementation is not the first attempt that tries to integrate composer with Nix. After a few days of developing, I discovered another attempt that seems to be in a very early development stage. I did not try or use this version.

Availability


composer2nix can be obtained from Packagist and my GitHub page.

Despite the fact that I did quite a bit of research, composer2nix should still be considered a prototype. One of its known limitations is that it does not support fossil repositories yet.